Forget the idyllic Instagram posts. Thriving in a van in Canada isn’t about finding the perfect view; it’s a relentless exercise in practical engineering. Your freedom is earned by mastering the unglamorous trinity of van life logistics: maintaining thermal balance against extreme temperatures, managing energy scarcity when the sun doesn’t shine, and handling your own water and waste logistical chain. This guide provides the hard-won, practical strategies to turn your vehicle into a resilient, four-season home.
The pictures sell a dream: a cozy van parked by a turquoise lake in Banff, laptop open, steam rising from a coffee mug. The reality, as any seasoned Canadian van lifer will tell you, is often less romantic. It’s waking up to frost on the *inside* of your windows, stressing about your battery levels after three straight days of coastal rain, or driving an extra hour to find a sani-dump that isn’t closed for the winter. While many start the journey for financial freedom, with some van dwellers in Canada keeping costs under $1,000 monthly, that freedom is built on a foundation of solid systems.
Most online advice offers simple solutions: “get good insulation,” “buy solar panels.” But in a country with punishing temperature swings, this isn’t enough. The key isn’t just having the gear; it’s understanding the physics behind it. It’s about building system resilience—creating power, water, and heating systems that don’t just work on a perfect summer day, but can withstand the shock of a -30°C cold snap or a week of West Coast drizzle. This isn’t just about comfort; it’s about survival.
This guide cuts through the fluff. We’re going to tackle the three core logistical pillars that determine your success or failure on the road. We’ll explore the science of staying warm (and cool), the hard math of keeping the lights on, the gritty details of water and waste, and the strategies that separate the weekend warrior from the full-time survivor. This is the stuff you need to know before you hit the Trans-Canada Highway.
To navigate these critical topics, this article is structured to address the most pressing challenges you’ll face. Below is a summary of the key areas we will cover, providing a roadmap to building a truly capable and self-sufficient mobile home.
Summary: A Guide to Canadian Van Life Logistics
- Why a Poorly Insulated Van Becomes an Oven by Day and a Fridge by Night
- Solar Panels or Alternator: How to Keep Your Batteries Charged When It Rains
- Where to Fill Your Fresh Water Tank Without Paying for a Campground
- The Mold Problem: Why Ventilation Is More Important Than Heating
- How to Empty Your Chemical Toilet Without Causing a Sanitary Disaster
- Sound-Deadening Mats and Door Seals: How to Make Your Old Van Quieter
- Why Your Autonomy Drops 40% at -20°C and How to Fix It
- Booking Campsites in National Parks: Strategies for Sold-Out Summers
Why a Poorly Insulated Van Becomes an Oven by Day and a Fridge by Night
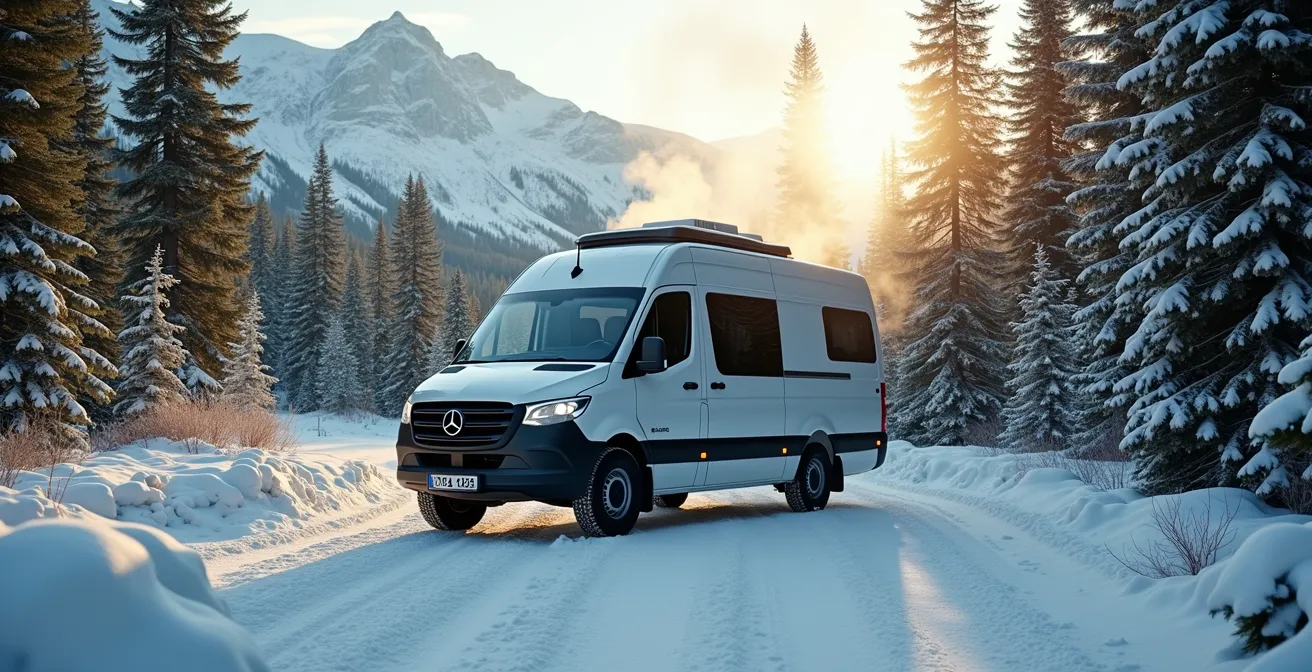
A van is essentially a metal box, and metal is a fantastic conductor of heat. This is the root of your biggest comfort problem. Without proper insulation, solar radiation on a summer day will turn your living space into a convection oven. At night, especially in winter, that same metal skin will radiate all your precious interior heat into the cold, leaving you shivering. This isn’t just about comfort; it’s about mastering thermal balance in a vehicle constantly at war with the outside temperature. The challenge is immense, as Canada’s extreme temperature swings strain insulation, often ranging from over +35°C to below -30°C.
The goal of insulation is to slow down heat transfer. In summer, it slows the sun’s heat from getting in. In winter, it slows your body heat and heater’s output from getting out. But not all insulation is created equal. Materials like fiberglass can lose effectiveness if compressed or exposed to moisture, while rigid foam boards offer consistent performance. The key is creating an unbroken thermal envelope, paying special attention to “thermal bridges”—metal parts like ribs and window frames that bypass your insulation and bleed heat.
A common mistake is focusing only on the R-value (a measure of thermal resistance) without considering the full system. Even with the best insulation in your walls, uninsulated floors, windows, and ceiling vents can undermine your entire setup. Real-world performance is what matters. In one test, a properly insulated van was able to maintain an internal temperature of 15°C when the outside plummeted to a brutal -30°C. While not a t-shirt temperature, it demonstrates how a well-engineered thermal system makes extreme conditions survivable and manageable, turning a metal box into a functional shelter.
Solar Panels or Alternator: How to Keep Your Batteries Charged When It Rains
Your electrical system is your lifeline. It runs your lights, fridge, water pump, and charges your devices. The dominant philosophy in van life is “free power from the sun,” leading many to cover their roofs with solar panels. And on a long, sunny day in the Okanagan, it works beautifully. But what about a week of relentless rain in Tofino, or the short, low-angle sun of a December day in Quebec? This is where the concept of energy scarcity becomes a harsh reality. Relying on a single power source is a recipe for disaster.
A truly resilient power system is about redundancy. Solar is your primary, but you need a solid Plan B and Plan C. The most common and reliable backup is charging from your vehicle’s alternator while you drive. A DC-to-DC charger is a non-negotiable piece of kit for any serious Canadian van lifer. It intelligently draws power from the alternator to top up your “house” batteries as you move from one spot to the next. An hour of driving can often replace what you’ve used in a day, making it a powerful tool for bridging sunless periods.

The debate isn’t “solar OR alternator”; it’s “solar AND alternator.” Your strategy should be to maximize solar when it’s available and lean on the alternator to fill the gaps. This requires a shift in mindset. You stop thinking like a homeowner with an endless supply from the grid and start thinking like an off-grid homesteader. You check your battery monitor like a gas gauge, you conserve power on cloudy days, and you plan your drives to coincide with low-power situations. This proactive management is what enables you to stay off-grid indefinitely, no matter what the Canadian weather throws at you.
Where to Fill Your Fresh Water Tank Without Paying for a Campground
Power gets a lot of attention, but water is the resource you’ll be hunting for most often. Your van’s freedom is directly tied to the size of your fresh water tank and your ability to refill it. This is your personal logistical chain, and you are the manager. While paid campgrounds almost always have potable water taps, the goal for many is to avoid these nightly fees. The good news is, with a little resourcefulness, Canada is full of places to find free, clean water.
The key is knowing where to look and what tools to use. Your smartphone is your best friend here. Apps like iOverlander and WikiCamps have user-vetted maps of water sources, from public sani-dumps to unassuming taps in small-town parks. You quickly learn the patterns: gas stations in Western Canada (especially Co-op) often have taps, municipal facilities provide services to support RV tourism, and even gym memberships can offer a reliable source for filling smaller containers. As veteran van-lifer Justin Credible, who has lived in his van for nearly 30 years, explains it:
It’s like living on a boat – you need to source your own water, find ways to dispose of waste, and create your own electricity. The lifestyle requires planning but allows financial freedom.
– Justin Credible
Finding water becomes a part of your daily rhythm. You learn to top up your tank whenever you see an opportunity, rather than waiting until you’re empty. This proactive approach prevents stressful situations where you’re forced to buy bottled water or pay for a campsite just for a refill. Mastering this skill is a true rite of passage in the van life community.
Your Action Plan: Finding Free Water Across Canada
- Get the Apps: Download iOverlander and WikiCamps Canada. Filter for “potable water” and check recent user comments for status updates.
- Scout Sani-Dumps: Many municipal and even some gas station sani-dumps have a separate, clearly marked tap for fresh water. Always use your own clean hose.
- Check Western Gas Stations: In BC, Alberta, and Saskatchewan, make a habit of checking CO-OP and Husky gas stations, as many have free water taps for customers.
- Find Town Taps: In smaller, rural communities (especially common in places like Newfoundland), look for public water taps in town squares, visitor centres, or community parks.
- Consider a Gym Membership: National chains like GoodLife Fitness or Anytime Fitness can provide shower access and a place to fill up water jugs in a pinch.
The Mold Problem: Why Ventilation Is More Important Than Heating
In the battle for a comfortable van, most people focus on installing a powerful heater. But a warm van that’s full of condensation is a breeding ground for a far more insidious enemy: mold. Every time you breathe, cook, or dry wet gear, you release water vapor into the air. When this warm, moist air hits a cold surface—like your window or a hidden metal rib behind the wall—it condenses into liquid water. This moisture is the lifeblood of mold and can quickly lead to musty smells, damaged woodwork, and serious health problems.
The common-sense solution might seem to be more heat, to “dry out” the air. This is a mistake. The real solution is ventilation. You have to get the moist air out and replace it with fresh, dry air from outside. It seems counterintuitive to invite cold air in when you’re trying to stay warm, but it’s non-negotiable. An astonishing 98% of water vapor transfer in building assemblies occurs through air movement, not diffusion through materials. This means you have to control the airflow to control the moisture.

Your primary weapon is a powered roof fan, like a MaxxAir or Fan-Tastic Vent. Running this on a low setting, even for just 15-20 minutes after cooking or when you wake up, can exchange the entire volume of air in your van. Cracking a window on the opposite side of the van creates cross-flow and makes the exchange even more effective. You’ll also discover the impact of thermal bridging firsthand. On a cold morning, you’ll see condensation forming on the exterior of your van, except for distinct lines where uninsulated metal frames are allowing heat to escape, creating cold spots inside that are damp to the touch. These are your problem areas, and constant air movement is the only way to keep them dry.
How to Empty Your Chemical Toilet Without Causing a Sanitary Disaster
It’s the least glamorous topic in van life, but one of the most important parts of your logistical chain: waste disposal. Specifically, what to do with the contents of your toilet. Whether you have a simple portable cassette toilet or a more complex black tank, you are responsible for disposing of its contents legally and ethically. “Dumping” anywhere other than a designated facility is illegal, environmentally harmful, and gives the entire van life community a bad name. Doing it right is simple, but requires planning.
Your goal is to find a “sani-dump” or “dump station.” These are purpose-built facilities designed to receive RV waste. They are commonly found at:
- Campgrounds and RV parks (often for a fee if you’re not a guest)
- Municipal facilities in towns that cater to tourists
- Select gas stations (like Canadian Tire and Petro-Canada in some regions)
- Truck stops along major highways
Again, apps like iOverlander and GasBuddy are indispensable for locating these points. The key is to plan ahead. In remote areas like Northern Ontario or the Yukon, dump stations can be hundreds of kilometres apart. You need to map them out along your route and empty your tank whenever the opportunity arises, not when it’s critically full. In winter, many outdoor stations close, so finding year-round indoor or heated facilities becomes a primary planning consideration. Always have a supply of non-toxic RV antifreeze on hand to prevent your waste tank and valves from freezing solid in the winter.
The process itself is straightforward: wear disposable gloves, connect your hose securely to the drain, empty the tank, and then rinse the tank and hose thoroughly using the provided non-potable water tap. Never use the fresh water tap for this purpose. It’s a simple process of hygiene and respect that ensures these facilities remain open and available for everyone. A little foresight turns a potentially catastrophic task into a routine, five-minute chore.
Sound-Deadening Mats and Door Seals: How to Make Your Old Van Quieter
After you’ve sorted out the thermal and electrical systems, you’ll start to notice another persistent issue: noise. A van is a big metal echo chamber. Road noise, engine drone, rain drumming on the roof, and the cycling of your own fridge and water pump can create a surprisingly stressful acoustic environment. A quiet van feels more like a home and less like a commercial vehicle. Achieving this comes down to a two-pronged approach: blocking outside noise and absorbing inside noise.
Many people don’t realize that their thermal insulation can also serve as a powerful sound-deadener. Materials with dense, irregular fiber structures are particularly effective at this. While Thinsulate is a popular choice for its thermal properties, materials like Havelock Wool offer superior sound-deadening qualities, excelling at dampening the high-frequency whine of a diesel heater or the clunk of a water pump. The goal is to fill cavities with this type of material to stop sound from resonating through the van’s structure.
However, insulation alone isn’t enough. For low-frequency road noise that vibrates through the floor and door panels, you need mass. This is where sound-deadening mats come in. These are heavy, butyl-based sheets that you stick directly to the sheet metal, adding mass to stop vibrations. Focusing on the wheel wells, floor, and doors makes a dramatic difference. Finally, check your door seals. Old, compressed rubber seals let in a huge amount of wind and road noise. Replacing them with new ones is a cheap and easy upgrade with a massive payoff in quiet comfort.
The table below compares common insulation materials, highlighting their sound absorption capabilities, which is a critical factor often overlooked when building for thermal performance alone. As shown, some materials provide excellent dual-purpose benefits.
| Material | Sound Absorption | Best Use Case | Canadian Availability |
|---|---|---|---|
| Thinsulate | Good | Wall cavities | Widely available |
| Havelock Wool | Excellent | Walls & ceiling | Special order |
| Closed-cell foam | Moderate | Gaps & crevices | Hardware stores |
| Reflectix | Poor | Windows only | Home Depot |
Why Your Autonomy Drops 40% at -20°C and How to Fix It
That 40% drop isn’t just a feeling; it’s a real and painful consequence of cold-weather physics affecting every system in your van. Your “autonomy”—your ability to function off-grid—is fundamentally compromised. This happens because the cold attacks your systems on multiple fronts: batteries lose efficiency, propane vaporizes less effectively, and even your insulation’s performance degrades. You’re using more energy to stay warm while your ability to store and generate that energy is reduced.
The most immediate hit is to your batteries. Lithium batteries (LiFePO4), the standard for serious van builds, cannot be charged below 0°C without causing permanent damage. Your battery management system (BMS) will prevent it, meaning your solar panels or alternator could be producing power, but your batteries aren’t accepting it. Lead-acid batteries fare even worse, with their effective capacity plummeting in the cold. The solution is to keep your batteries within the heated envelope of your van, not in an uninsulated external box.
Your thermal autonomy also takes a hit. The effectiveness of your insulation, measured in R-value, is not static. For example, some common polyiso insulation loses significant R-value in cold temperatures, dropping from R-5.6 at a comfortable 24°C to R-5.0 or lower at -10°C. This means your heater has to work harder, consuming more fuel and electricity just to maintain the same temperature. But the biggest vulnerability is your water system. Frozen pipes and tanks can mean a catastrophic failure. Winterizing your water system is not optional; it’s a critical survival task.
- Install flexible PEX pipes, which can handle some expansion if they freeze.
- Apply 12V heat tape to vulnerable water lines and wrap them in insulation.
- Insulate your water tanks with at least 2 inches of closed-cell foam.
- Whenever possible, design your build so that all tanks and plumbing are inside the van’s heated space.
Fighting the cold is about proactive defense: protecting your batteries, beefing up insulation where it counts, and ensuring your water can’t freeze. It requires more power, more fuel, and more vigilance.
Key Takeaways
- Master Thermal Balance: Your primary job is to manage heat flow. This means quality insulation, eliminating thermal bridges, and using ventilation to control moisture.
- Build for Energy Scarcity: Never rely on a single power source. A combination of solar and alternator charging creates a resilient system that can survive sunless weeks.
- Own Your Logistical Chain: Proactively managing your water supply and waste disposal by planning your route around known resources is a non-negotiable daily task.
Booking Campsites in National Parks: Strategies for Sold-Out Summers
While much of van life is about finding freedom away from the crowds, sometimes you want to be right in the heart of the action—in places like Banff, Jasper, or the Pacific Rim. This presents a new challenge: competition. Prime campsites in Canada’s national parks are often booked solid months in advance, the moment they become available online. Showing up and hoping for a spot is a recipe for disappointment, especially in July and August. However, with the right strategy, you can still snag a spot, or better yet, find incredible alternatives no one else knows about.
First, play the reservation game. Use the Parks Canada website to check for last-minute cancellations. Many people book far in advance and their plans change. There are even third-party services that will scan for openings at your desired campground and notify you for a small fee. Second, be flexible. Look for campgrounds that are just outside the national park boundaries. These provincial parks or private campgrounds are often less crowded and can be just as beautiful. But the real veteran’s move is to abandon the reservation system altogether.
Canada has vast swaths of Crown Land, particularly in provinces like British Columbia and Alberta, where camping is often free and legal for Canadian residents. These areas, sometimes called Public Land Use Zones (PLUZ), offer a level of solitude and natural beauty that can surpass even the most popular national parks. Apps like iOverlander are invaluable for finding vetted Crown Land spots with good access and amazing views. This is the ultimate expression of van life freedom—leaving the crowded campgrounds behind and finding your own private piece of the Canadian wilderness. It’s a different world from the more developed East, as one van lifer noted in an interview:
The difference is that nobody is doing it out East. There’s almost nobody and we thought it seemed very popular to us in the West.
– Mat Dubé, CBC News
Now that you have the core strategies for power, water, waste, and lodging, the next step is to integrate them into a cohesive daily and weekly routine that makes these tasks second nature.
Frequently Asked Questions About Van Life Logistics in Canada
How do I handle frozen waste tanks in a Canadian winter?
Prevention is key. Insulate your tanks and valves with closed-cell foam. Use non-toxic RV antifreeze, specifically designed for Canadian winters, in both your black and grey tanks to lower the freezing point of the contents. On extremely cold nights, running your heater can also help keep the under-van components above freezing.
What are the typical dump station fees by province in Canada?
Fees can vary significantly. Many municipal-run sani-dumps are free or operate by donation. Private campgrounds and gas stations typically charge a fee, which can range from $5 to $15 or more. Prices are often higher in major tourist areas and can fluctuate by province, with no standard national rate.