
Time, not impact, is the primary, invisible enemy of your helmet’s structural integrity.
- The protective EPS foam inside your helmet chemically degrades within 5-7 years, losing its ability to absorb impact energy even if it has never been dropped.
- Newer ECE 22.06 standards are the only certifications that mandate testing for rotational acceleration, a primary mechanism of concussion and brain injury that older standards ignore.
Recommendation: Audit your gear based on manufacturing dates and certification labels (ECE 22.06, EN 17092, EN 13594), not on its visual appearance or lack of crash history.
You look at your helmet. It’s been with you for a decade, a trusted companion on countless journeys. It has no cracks, the paint is still good, and it’s never been in a crash. It feels solid. The common wisdom is, “if it ain’t broke, don’t fix it.” This reasoning is dangerously flawed. As a materials engineer, I can state unequivocally: your gear is a system of advanced polymers and composites with a finite lifespan, governed by the unyielding laws of physics and chemistry, not sentiment.
The belief that protective gear is only compromised by impact is a fundamental misunderstanding of material science. The slow, invisible degradation of its components is a far more insidious threat. We do not judge the safety of a vehicle’s airbags based on whether the dashboard looks clean; we replace them based on a manufacturer’s engineered service life. Your personal protective equipment demands the same disciplined, evidence-based approach. The difference between walking away from a slide and suffering catastrophic injury is not luck; it’s a calculated outcome determined by energy management, abrasion resistance, and system integrity—all of which decay over time.
This analysis will not be a list of opinions. It is a clinical dissection of gear failure from a scientific standpoint. We will examine the chemical breakdown of helmet foam, the physics of rotational brain injury, the measurable difference in energy transference in body armour, and the catastrophic failure of inadequate materials like denim against asphalt. The objective is to replace assumption with understanding, enabling you to make rational, life-preserving decisions about the equipment you trust.
This guide provides a clinical, evidence-based examination of your equipment’s real-world performance and degradation. The following sections break down the science behind each critical piece of your protective gear.
Summary: Motorcycle Gear Safety Standards: Is Your Old Helmet Still Safe?
- Why la mousse EPS se dégrade-t-elle après 5 ans même sans accident ?
- Quelle certification offre la meilleure protection contre les commotions cérébrales ?
- Mousse d’origine ou niveau 2 : pourquoi upgrader la plaque dorsale de votre blouson ?
- Le mythe de la protection du denim : pourquoi la peau part-elle en 0.4 seconde sur l’asphalte ?
- Comment savoir si vos gants ne s’arracheront pas en cas de glissade ?
- L’erreur de changement de voie qui cause 30% des accidents latéraux sur autoroute
- Combinaison de pluie ou vêtements laminés Gore-Tex : quel équipement pour rester sec ?
- Quoi ajouter à la trousse standard pour gérer les blessures mineures sur la route ?
Why la mousse EPS se dégrade-t-elle après 5 ans même sans accident ?
The primary impact-absorbing material in your helmet is Expanded Polystyrene (EPS) foam. It is not a solid, inert plastic. It is a matrix of tiny, gas-filled beads fused together. Its protective function relies on these beads crushing under impact, absorbing and dissipating energy that would otherwise be transferred to your skull. However, this material degrades chemically from the moment of its manufacture, a process that occurs regardless of use or impact history. The glues, resins, and binding agents that hold the EPS matrix together undergo off-gassing, slowly breaking down and becoming brittle.
This degradation is insidious because it is largely invisible. A 10-year-old helmet may look pristine externally, but its EPS liner has lost pliability. Instead of crushing in a controlled manner to absorb energy, the aged foam becomes hard and brittle. Upon impact, it can fracture or fail to compress adequately, transferring a dangerous amount of force directly to the rider’s head. This is why most manufacturers recommend replacing helmets after 4 to 6 years. This is not a marketing tactic; it is a directive based on the predictable chemical decomposition of the primary safety component.
Furthermore, exposure to body oils, sweat, and cosmetic products accelerates this breakdown. These substances chemically attack the EPS structure, weakening it from the inside out. A helmet’s safety is not defined by its outer shell, but by this inner liner’s ability to perform its one, critical job. After five years, that ability is scientifically compromised.
Your Helmet’s EPS Integrity Audit
- Check Manufacturing Date: Locate the sticker on the helmet’s interior or chin strap. The service life starts from this date, not the date of purchase.
- Perform a Compression Test: Press firmly on the EPS foam with your thumb. It should feel resilient and spring back. If it feels brittle, overly soft, or leaves a permanent indentation, it has degraded.
- Inspect for Delamination: Look for any separation or gaps between the EPS foam liner and the helmet’s outer shell. This indicates a failure of the bonding agents.
- Examine Foam Colour: Inspect for signs of yellowing or discoloration. While not a definitive test, it can indicate chemical aging and exposure to UV light or other contaminants.
- Test Foam Recovery: Gently press and release the foam. Degraded foam will have a slow or incomplete recovery, failing to return to its original shape properly.
Quelle certification offre la meilleure protection contre les commotions cérébrales ?
Historically, helmet standards like the North American DOT (FMVSS 218) have focused almost exclusively on linear impact absorption—crushing force from a direct, 90-degree hit. While critical, this fails to address a primary cause of concussion and severe brain injury: rotational acceleration. In most real-world crashes, the head strikes a surface at an angle, creating a violent twisting motion. This rotation causes the brain to shear against the inside of the skull, leading to diffuse axonal injury. The new European ECE 22.06 standard is the first mainstream certification to make testing for this mechanism mandatory.
This is not a minor iteration; it is a paradigm shift in safety engineering. As a core requirement, ECE 22.06 includes mandatory rotational acceleration testing using angled impacts on a 45-degree anvil. This test specifically measures the rotational forces transmitted to the head form, with a pass/fail metric known as the Brain Injury Criterion (BrIC). By contrast, DOT has no such requirement, and the voluntary Snell standard only includes it as an optional test. Therefore, a helmet certified to ECE 22.06 offers a scientifically validated, superior level of protection against the specific forces that cause concussions.
This paragraph introduces a complex concept. To understand it, it’s helpful to visualize its main components. The illustration below breaks down this process.
As this diagram of the testing protocol shows, the angled anvil is designed to induce the exact twisting motion that older standards ignored. When choosing a helmet, looking for the ECE 22.06 label is the single most effective way to ensure it has been engineered and tested to mitigate the forces of rotational acceleration, offering a quantifiable advantage in preventing brain injury.
The following table provides a clear comparison of the standards legally recognized in Canada, highlighting their approach to this critical safety metric.
| Standard | Rotational Testing | Legal in Canada | Key Features |
|---|---|---|---|
| ECE 22.06 | Yes (Mandatory) | Yes | 45° angled impact, BrIC < 0.78, multiple impact speeds |
| DOT FMVSS 218 | No | Yes | Focus on shock absorption, no chin bar testing |
| Snell M2020 | Optional (M2020R only) | Yes | Strictest impact testing, edge anvil tests |
Mousse d’origine ou niveau 2 : pourquoi upgrader la plaque dorsale de votre blouson ?
Many motorcycle jackets are sold with a “back protector” that is nothing more than a flimsy piece of open-cell foam. This is not armour; it is a placeholder. Its purpose is to give the jacket shape on the retail rack. In an impact, it offers negligible energy absorption. Upgrading to a certified back protector is not an enhancement; it is the installation of a non-negotiable, core safety component. The standard for this armour is EN 1621-2, which classifies protectors as Level 1 or Level 2 based on the amount of force they transmit to the body upon impact.
The test involves dropping a 5kg striker onto the armour to create a 50 Joule impact. To achieve a Level 1 rating, the protector must transmit an average of less than 18 kilonewtons (kN) of force, with no single impact exceeding 24 kN. To achieve the superior Level 2 rating, the protector must transmit an average of less than 9 kN, with no single impact exceeding 12 kN. In engineering terms, a Level 2 protector allows, at most, half the impact force to reach your spine compared to a Level 1 protector. The difference is not marginal; it is the difference between a severe bruise and a potential spinal column injury.
Given that the typical cost of upgrading to a Level 2 back protector is C$50-C$150 in Canada, the cost-benefit analysis is starkly in favour of the upgrade. The stock foam placeholder transmits nearly the entire 50J impact force directly to your body. Investing in a Level 2 protector is one of the most cost-effective safety improvements a rider can make, directly reducing the risk of catastrophic, life-altering injury.
Your Back Protector Audit Protocol
- Assess Your Riding Environment: Higher speeds on highways or mountain passes demand Level 2 protection. City commuting still benefits significantly from the upgrade.
- Verify CE Certification and Level: Remove the protector. Look for the EN 1621-2:2014 marking and a pictogram showing a motorcyclist with the number “2” inside, indicating Level 2.
- Confirm Fit and Compatibility: Ensure the new protector’s dimensions match your jacket’s armour pocket precisely. A protector that shifts is a protector that fails.
- Analyze Coverage Area: Compare the surface area. Quality Level 2 protectors often provide wider, more comprehensive coverage of the spine and scapulae.
- Test for Movement Restriction: Wear the jacket with the new armour. It should conform to your back and not impede necessary riding movements or create pressure points.
Le mythe de la protection du denim : pourquoi la peau part-elle en 0.4 seconde sur l’asphalte ?
The belief that regular denim jeans offer meaningful protection is a pervasive and dangerous myth. The critical failure mode is abrasion. The coefficient of friction between cotton denim and asphalt is extremely high, while its tensile strength is remarkably low. When a rider slides, the denim is subjected to intense frictional heat and tearing forces. It disintegrates almost instantly. A typical slide at just 50 km/h will shred standard denim and expose skin to the road surface in a fraction of a second, resulting in severe “road rash,” a traumatic friction burn that removes skin and tissue down to the muscle or bone.
To quantify this, the European standard EN 17092 was established to provide a rigorous classification for protective motorcycle garments based on their abrasion resistance. Garments are tested using methods like the “Darmstadt” machine, which measures how long a material survives being abraded against a concrete block at a set speed. The results led to a clear rating system: A, AA, and AAA. As the data shows, regular denim provides virtually no slide time. Proper riding jeans, reinforced with aramid fibers (like Kevlar®) or woven with high-strength materials (like Cordura®), are specifically engineered to withstand these forces.
This is not a matter of opinion but of physics. The data is unequivocal.
The table below, based on the principles of the EN 17092 standard, starkly illustrates the performance gap between fashion denim and purpose-built riding gear.
| Material | EN 17092 Rating | Slide Time | Speed Protection |
|---|---|---|---|
| Regular Denim | None | 0.4 seconds | < 30 km/h |
| Class A Riding Jeans | A | 1+ seconds | 30-50 km/h |
| Class AA Gear | AA | 2+ seconds | 50-70 km/h |
| Class AAA Gear | AAA | 4+ seconds | 70+ km/h |
Comment savoir si vos gants ne s’arracheront pas en cas de glissade ?
In a crash, the hands almost instinctively go out to break the fall. Consequently, gloves are a first point of contact. Their primary failure mode is not abrasion, but retention failure. A glove that is torn from the hand during a slide offers zero protection. Many fashion or light-duty gloves use a simple elasticated cuff, which provides no meaningful security. A proper riding glove must have a robust, dedicated wrist retention strap that can be cinched tight. This strap is the single most critical feature preventing the glove from being ripped off upon impact with the pavement.
The governing standard is CE EN 13594:2015. This certification tests for abrasion resistance, seam strength, and, crucially, retention. It also defines two levels of protection. A key distinction, as noted in the European Standard EN 13594:2015, is that hard knuckle protection is not required for a Level 1 rating but is mandatory to achieve Level 2. Beyond certification, a visual inspection reveals much. Look for double or triple stitching in high-stress areas. Examine the palm for a palm slider—a hard piece of TPU or a similar low-friction material (like the Knox SPS system). Its purpose is to allow the hand to slide rather than grip the pavement, which can cause the wrist to break or send the body into a violent tumble.
This macro photograph highlights the essential components: the robust wrist strap for retention and the hard palm slider to manage friction.
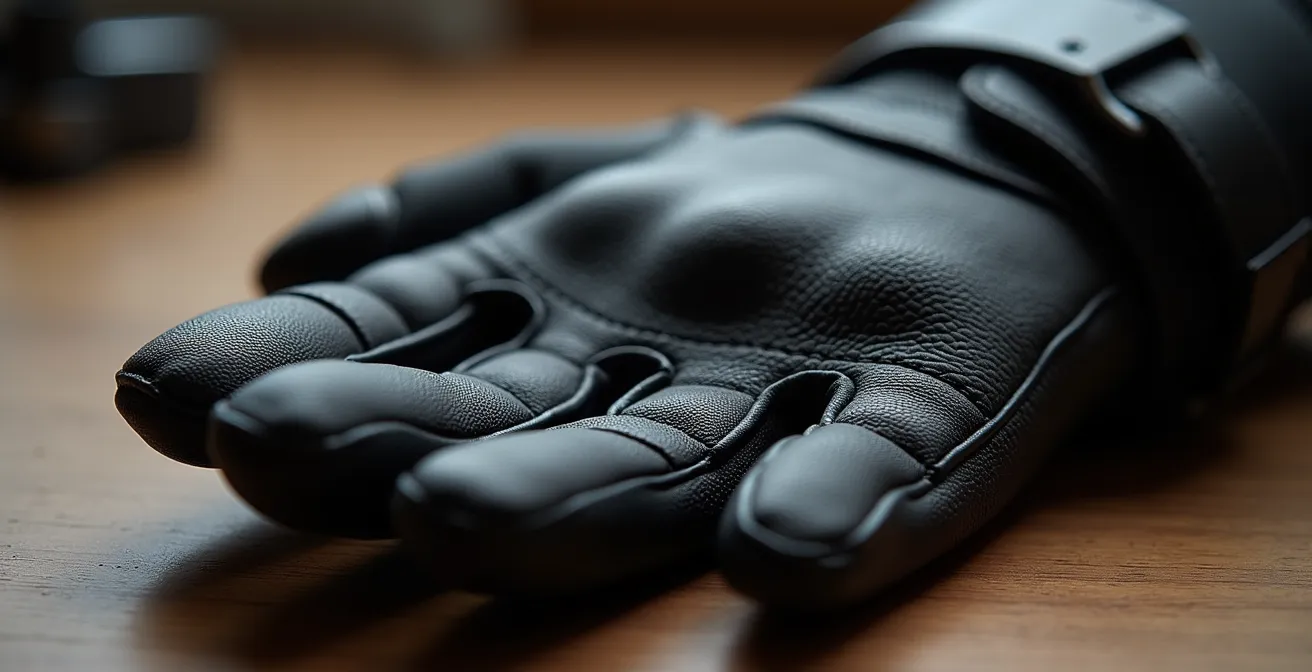
When selecting gloves, your first check should be for a secure wrist strap. Your second should be the CE certification label. Your third should be the presence of a palm slider. A glove lacking these three components is not fit for purpose.
Glove Integrity and Retention Checklist
- Verify Wrist Retention: Confirm the presence of a secure, non-elastic wrist retention strap that can be firmly fastened. This is non-negotiable.
- Check for CE Certification: Look for the CE EN 13594:2015 label inside the glove, and identify whether it is rated Level 1 or Level 2 (LP2).
- Inspect Stitching Quality: Examine the seams, especially around the fingers and palm. Double or triple stitching is a sign of robust construction.
- Confirm Palm Slider Presence: A hard slider on the heel of the palm is critical to reduce friction and prevent “grip and-tumble” injuries.
- Ensure Knuckle Protection (for Level 2): If you require the highest level of protection, confirm the presence of certified hard knuckle armour.
L’erreur de changement de voie qui cause 30% des accidents latéraux sur autoroute
While gear is critical for mitigating injury during a crash, certain equipment choices can actively help prevent the crash from occurring. A significant portion of motorcycle accidents, particularly on multi-lane highways like Ontario’s 401 or Quebec’s 20, involve other vehicles changing lanes into the rider. The root cause is a failure of conspicuity—the rider simply was not seen. A motorcycle presents a very narrow visual profile, making it easy to disappear into a car’s blind spot or be lost in the visual clutter of traffic.
The solution is to maximize your visual footprint. Research from transport authorities, including a study by the province of Alberta, consistently shows that wearing orange, yellow and white helmets and jackets makes a rider significantly more visible to other motorists. The human eye is naturally drawn to these high-contrast, fluorescent colours. Black gear, while traditional, is the functional equivalent of camouflage in a complex urban or highway environment. This is not a matter of style; it is a strategic decision to make yourself as conspicuous as possible to inattentive drivers.
Beyond gear colour, lane positioning is an active form of protection. You must manage the blind spots of the vehicles around you. Avoid riding directly behind or adjacent to cars for extended periods. The best practice is to position yourself in a lane position (typically the left or right third) that makes you clearly visible in the side and rear-view mirrors of the driver ahead and the driver in the adjacent lane. The goal is to be an unavoidable presence in their field of view, forcing them to acknowledge your position before initiating a maneuver. Combining high-visibility gear with dominant lane positioning is a two-pronged strategy to combat the primary cause of lane-change accidents.
Combinaison de pluie ou vêtements laminés Gore-Tex : quel équipement pour rester sec ?
Maintaining body temperature and comfort is a critical safety factor. A cold, wet rider is a distracted, fatigued rider with slower reaction times. There are two primary engineering approaches to waterproofing: an external rain suit worn over regular gear, or a laminated textile garment (e.g., Gore-Tex). While a simple rain suit has a low initial cost, it suffers from significant performance and logistical drawbacks. It is not breathable, leading to a build-up of perspiration and a “boil-in-the-bag” effect. Furthermore, in prolonged rain, the outer textile of your primary jacket becomes saturated, heavy, and cold—a phenomenon known as “wet-out.”
Laminated gear, by contrast, bonds a waterproof and breathable membrane directly to the inside of the outer shell fabric. This prevents the outer material from ever becoming saturated. Water simply beads off, the garment remains lightweight, and the rider stays dry from both external rain and internal perspiration. While the initial investment is significantly higher, its performance, durability, and convenience are orders of magnitude greater. There is no need to stop and pull on a separate suit, and its performance is consistent all day, a crucial factor when riding in variable Canadian weather, such as a coastal storm in British Columbia.
When analyzed from a total cost of ownership perspective, the value proposition becomes clearer. A cheap rain suit may need replacement every couple of seasons, while a quality laminated suit can last a decade or more with proper care, making the annual cost more comparable than it first appears.
This comparative analysis, with costs estimated for the Canadian market, demonstrates the long-term trade-offs between the two systems.
| Feature | Rain Suit | Laminated Gore-Tex |
|---|---|---|
| Initial Cost | C$150 | C$1000+ |
| Lifespan | 2 years average | 8+ years |
| Cost per year | C$75 | C$125 |
| BC Rain Performance | Wet-out in prolonged rain | Stays dry all day |
| Storage Required | Separate carry bag | Wear as primary gear |
Key Takeaways
- Helmet EPS foam degrades chemically in 5-7 years, rendering it ineffective regardless of impact history.
- ECE 22.06 is the superior helmet standard as it is the only one mandating tests for rotational forces, a key cause of concussion.
- Upgrading from stock foam to a Level 2 back protector halves the amount of impact force transmitted to your spine.
Quoi ajouter à la trousse standard pour gérer les blessures mineures sur la route ?
A standard first-aid kit containing adhesive bandages and antiseptic wipes is inadequate for the types of trauma encountered in a motorcycle accident. A rider’s kit must be a trauma kit, specifically equipped to handle catastrophic bleeding and manage shock until professional help arrives. In many parts of Canada, from remote stretches of the Trans-Canada Highway to rural provincial roads, emergency response times can be prolonged. The rider must be prepared to be their own first responder for a critical window of time. This requires specific, life-saving tools that go far beyond a basic kit.
The absolute priority is haemorrhage control. Arterial bleeding from a limb can be fatal in minutes. Therefore, the most critical addition is a Combat Application Tourniquet (CAT) or a similar windlass-style tourniquet approved by the Committee on Tactical Combat Casualty Care. This is a non-negotiable component. The second is a hemostatic agent, such as QuikClot or Celox, which contains minerals that rapidly accelerate the body’s natural clotting process when packed into a severe wound. These two items alone fundamentally transform a first-aid kit into a trauma kit.
Additional items should focus on managing shock and facilitating rescue. An emergency Mylar blanket weighs almost nothing but is essential for preventing hypothermia in an injured person, even on a warm day. Trauma shears are necessary for cutting through tough riding gear like leather or textile to access an injury. Finally, for riders who travel in areas with no cellular service, a satellite communicator like a Garmin inReach or SPOT is not a luxury; it is a vital piece of life-saving equipment. As noted by safety experts:
For rides in areas with slow emergency response like Northern Ontario, a trauma kit with tourniquet and hemostatic agents, plus hands-on training from St. John Ambulance, is crucial
– Emergency Response Guidelines, Remote Riding Safety Recommendations
Essential Trauma Kit Additions for Canadian Riders
- Tourniquet: Add a CAT (Combat Application Tourniquet) or similar approved windlass-style tourniquet and get training on its proper use.
- Hemostatic Agent: Include a packaged hemostatic agent (e.g., QuikClot, Celox) for packing deep wounds to control severe bleeding.
- Satellite Communicator: For remote or cellular-dead zones, carry a device like a Garmin inReach or SPOT to summon help.
- Emergency Blanket: A compact Mylar blanket is critical for treating shock and preventing hypothermia.
- Trauma Shears: These are designed to easily cut through heavy riding gear to access injuries. Standard scissors will fail.
The next logical step is not to buy new gear blindly, but to conduct a systematic, evidence-based audit of your current equipment. Start today. Your life is not an acceptable margin of error.