
The key to mastering unstable terrain isn’t your vehicle’s 4WD system; it’s proactively managing your vehicle’s finite “traction budget.”
- Momentum is a stored energy asset that must be precisely controlled to either float over or power through different surfaces.
- Every surface—mud, sand, and gravel—has a unique physical failure point, and expert driving is the art of operating just below that threshold.
Recommendation: Shift your mindset from reacting to hazards to proactively controlling weight transfer, tire footprint, and rotational speed to maintain grip at all times.
The feeling is unmistakable. A slight wiggle from the rear on a loose gravel corner, the steering suddenly going light and unresponsive in deep sand, or that gut-wrenching sinking sensation as your tires stop turning in thick mud. For any driver exploring the vast and varied Canadian landscape, these moments are not a matter of if, but when. Conventional wisdom offers a familiar checklist: lower your tire pressure, maintain your momentum, and engage four-wheel drive. While not incorrect, this advice only describes the *what*, not the *why*. It treats the vehicle as a simple tool and the driver as a passive operator.
But what if the true key to control lies deeper? What if mastering these surfaces is less about following a recipe and more about understanding the physics of the interaction between your tires and the ground? As a pilot, you learn that your vehicle has a finite traction budget—a delicate balance of forces that can be spent on accelerating, braking, or turning, but never all at once. Exceeding this budget results in a slip, a slide, or getting stuck. The difference between an amateur and an expert is the ability to anticipate and manage these forces before they manage you.
This guide departs from simple tips and dives into the physics of vehicle dynamics. We will deconstruct each challenging surface—mud, sand, and gravel—to analyze the specific forces at play. You will learn to think in terms of momentum as a controllable asset, understand the concept of hydrodynamic suction in mud, the ball-bearing effect of gravel, and how to use load transfer to your advantage. By the end, you will have a framework not just for reacting to problems, but for piloting your vehicle with precision and confidence across any unstable terrain Canada throws your way.
To navigate this complex topic, we have structured this guide to build your knowledge layer by layer. Each section tackles a specific challenge, explaining the underlying physics and providing actionable techniques derived from that understanding. The following summary outlines the critical skills you will acquire.
Summary: Driving on Sand, Mud, and Gravel: Adjusting Your Technique for Each Surface
- Why s’arrêter dans la boue profonde est-il la garantie de rester pris ?
- Accélération douce ou brutale : comment garder la voiture “au-dessus” du sable ?
- Comment gérer le survirage quand les billes de gravier agissent comme des roulements ?
- Le risque de glissade incontrôlée : pourquoi utiliser le frein moteur en pente abrupte ?
- Quand faire demi-tour : les signes visuels d’un sol qui va s’effondrer sous vos roues
- Comment redresser votre voiture en glissade sans utiliser la pédale de frein ?
- Pneus homologués hiver ou vrais pneus à neige : lequel choisir pour Montréal vs Vancouver ?
- Driving on Active Logging Roads: Rules of the Road and CB Radio Etiquette
Why Stopping in Deep Mud is a Guarantee of Getting Stuck
The primary reason a vehicle becomes hopelessly stuck in mud is not merely from sinking due to its weight. The true enemy is a physical phenomenon known as hydrodynamic suction. When your vehicle is moving, its tires are constantly displacing the viscous, water-logged soil. However, the moment you stop, the mud settles and forms a vacuum-like seal around the tires and, more critically, the undercarriage and differentials. This suction creates a powerful downward force that can be far greater than the vehicle’s own weight, effectively gluing it to the ground. Restarting requires overcoming not only the initial inertia and the mud’s resistance but also this immense suction force, a task for which your tires’ available traction is often insufficient.
This is why maintaining momentum is the cardinal rule of mud driving. Momentum is your primary tool to prevent suction from forming. A consistent, steady speed—not too fast to cause loss of control, not too slow to sink—allows the tires to continuously shear through the mud and find firmer ground, or at least stay “on top” of the most viscous layer. As seen on many Canadian forest tracks, the base of a hill is a natural collection point for water, creating deep, challenging mud holes. The correct technique is to build steady momentum *before* the mud, engage a low-range gear (like second or third) for consistent torque, and power through without hesitation.
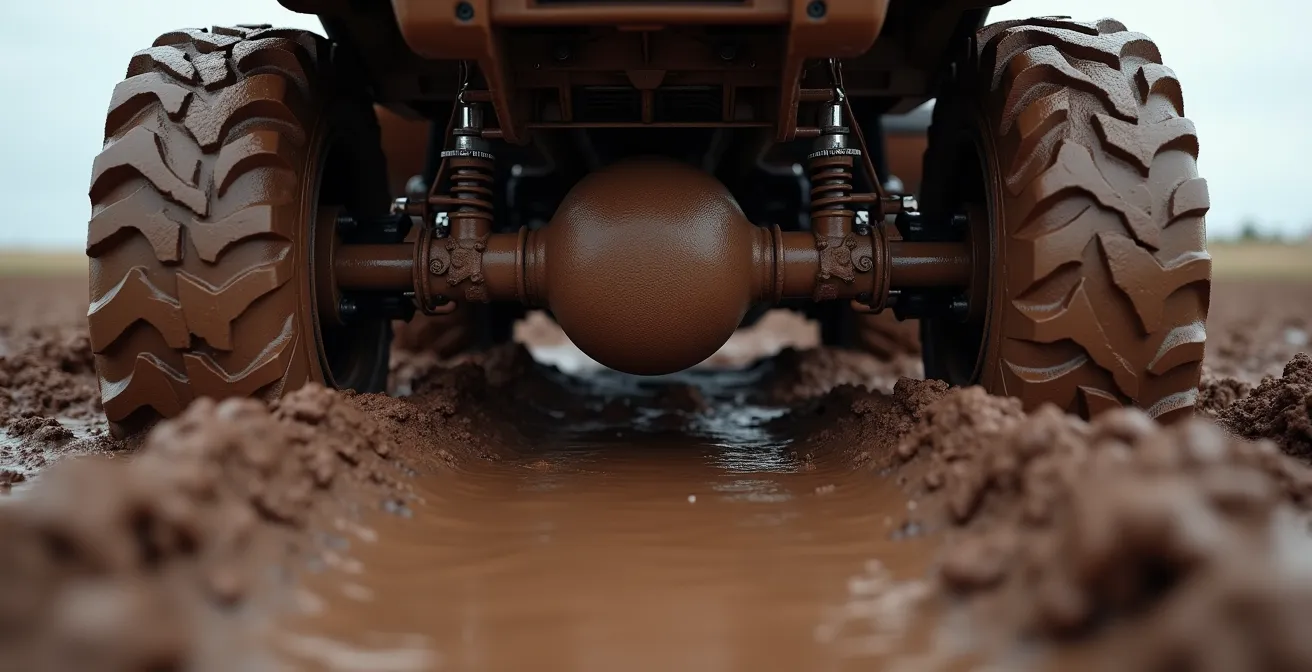
The image above illustrates the worst-case scenario: a vehicle’s differential bottomed out in the thick, “gumbo” clay common to the Canadian Prairies. At this point, the tires have lost their ability to find traction, and the frame itself is resting on the mud, with suction sealing its fate. If you do feel your wheels start to spin and lose forward progress, immediately stop accelerating. Gently “see-sawing” the steering wheel can allow the front tires’ side lugs to bite into fresh mud and find new grip. If fully stuck, the “rocking technique”—gently switching between drive and reverse—can sometimes be enough to break the hydrodynamic seal and build just enough momentum to escape.
Gentle or Brutal Acceleration: How to Keep the Car “on top” of the Sand
Driving on sand is fundamentally about one principle: flotation. Unlike hard ground, sand has very low shear strength. Aggressive acceleration and spinning tires immediately break this strength, digging you down until the chassis rests on the sand. The goal is not to dig for traction, but to stay “afloat” on the surface. The single most effective technique to achieve this is to significantly reduce tire pressure. By lowering pressure, you dramatically increase the tire’s footprint—the length and width of the contact patch. This distributes the vehicle’s weight over a much larger area, reducing the pounds per square inch (PSI) exerted on the sand and preventing the tire from breaking through the surface.
For most vehicles, off-road experts suggest that reducing tire pressure to around 15-20 PSI is the optimal starting point for soft sand. However, this varies by vehicle class. On the firm, damp sand of a Great Lakes beach, higher pressures may be fine, but in deep, soft dunes, lower is better. Always be aware of incoming tides, as wet sand can hide treacherous “floating” sand or quicksand. Once pressures are lowered, acceleration must be exceptionally smooth and gradual. Use a low-range gear to provide high torque at low wheel speed, allowing the vehicle to move forward without spinning the tires. It’s a delicate balance of applying just enough power to build momentum without breaking traction.
The ideal pressure is highly dependent on your specific vehicle. The following table provides a starting point for different classes of vehicles commonly found on Canadian roads, which should be adjusted based on the specific sand conditions encountered.
| Vehicle Class | Starting PSI | Soft Sand PSI | Firm Sand PSI |
|---|---|---|---|
| Crossover/Small SUV | 32-35 | 18-22 | 24-28 |
| Mid-Size SUV | 35-38 | 16-20 | 22-26 |
| Half-Ton Truck | 38-45 | 15-18 | 20-24 |
| Heavy Duty Truck | 45-55 | 20-25 | 28-32 |
In summary, acceleration on sand should be gentle and deliberate. It is a finesse game. Brutal acceleration is a guaranteed way to spend your afternoon digging. Think of your vehicle as a boat; you want to get it “on plane” and keep it there with smooth, consistent throttle input.
How to Manage Oversteer when Gravel Acts like Ball Bearings
Driving on a loose gravel road is like driving on a surface of millions of tiny ball bearings. The layer of loose aggregate between your tires and the hard-packed base beneath dramatically reduces the coefficient of friction. This means your traction budget is significantly smaller than on pavement. Oversteer—when the rear of the vehicle slides out—occurs when the cornering or acceleration forces demanded of the rear tires exceed this limited budget. A common cause is entering a corner too fast or applying too much throttle mid-corner, causing the rear wheels to break traction and slide sideways on the “ball bearings.”
Many drivers incorrectly believe that a four-wheel-drive system will prevent this. However, this is a dangerous misconception that can lead to a false sense of security. As technical experts point out, 4WD is primarily designed to aid traction during acceleration, not during braking or cornering. As the Tread Magazine Technical Team clarifies in their guide, “4×4 Driving Tips: Master Off-Road Terrain”:
In reality, 4WD systems are designed to help with traction when you’re accelerating—especially on loose gravel, mud, snow, or sand—not when you’re trying to slow down or navigate corners. When it comes to braking, every vehicle—4WD, AWD, or 2WD—relies on the grip of its tires and the effectiveness of its brakes, not on the drive system itself.
– Tread Magazine Technical Team, 4×4 Driving Tips: Master Off-Road Terrain
To manage oversteer, prevention is key. Reduce your speed on Canadian gravel roads to a manageable 60-70 km/h. If a slide does begin, fight your instincts. Do not slam on the brakes, which will likely lock the wheels and worsen the slide. Instead, immediately look far down the road to your intended exit point, not at the ditch you’re trying to avoid. Smoothly steer *into* the skid (i.e., if the rear is sliding right, steer right). In an AWD or 4WD vehicle, a gentle and smooth application of the throttle can help the front wheels pull the car straight, effectively transferring some of the load and regaining control.
The Risk of Uncontrolled Sliding: Why Use Engine Braking on a Steep Slope
Descending a steep, loose, or slippery grade, such as a mountain pass in the Rockies, presents a significant risk of an uncontrolled slide. The force of gravity is constantly trying to accelerate your vehicle, and the natural instinct is to manage this with the brake pedal. However, this can be a critical error. Your tires have a finite amount of grip—the traction budget—which must be shared between braking forces and steering forces. On a low-traction surface, even moderate braking can consume the entire budget, leaving no grip available for steering. This is how a vehicle begins to slide sideways, with the driver having no control to steer out of it.
The solution is to use engine braking. By selecting a low gear (in both automatic and manual transmissions), you use the engine’s internal compression to slow the vehicle’s rotation. This provides a constant, smooth braking force to all four wheels (in a 4WD vehicle) without the risk of locking them up like a conventional brake application can. This technique keeps the majority of your traction budget available for steering, allowing you to maintain directional control even on a very steep and slippery descent.
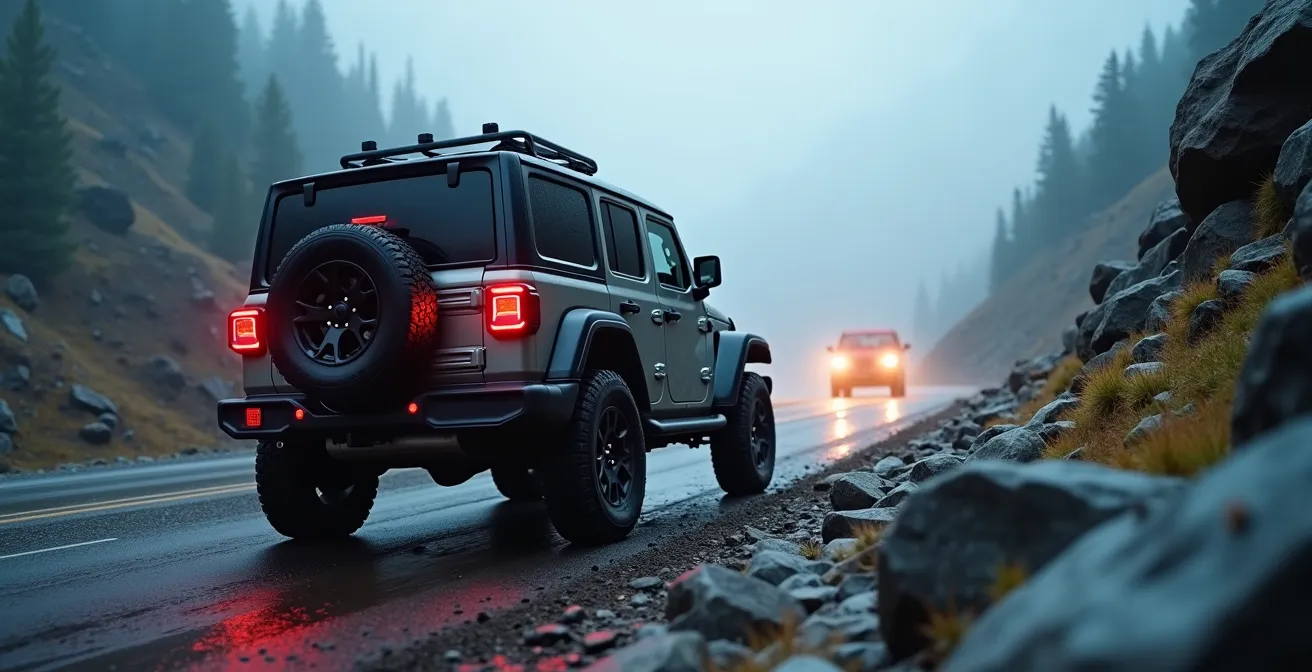
This image of a vehicle on a steep Canadian pass, like the Coquihalla, visualizes the scenario. The driver’s goal is to maintain a slow, controlled speed without touching the brakes, keeping them cool and ready for an emergency. According to off-road training experts, usually 2nd gear is optimal for controlled descents in a manual, while an automatic in ‘D3’ or a dedicated low-range mode will achieve a similar effect. For extremely challenging descents, such as in deep mud, modern Terrain Response systems can be engaged to further optimize throttle and braking response, but the core principle of using a low gear remains paramount.
When to Turn Back: The Visual Signs of a Ground That Will Collapse Under Your Wheels
The most important off-road skill is not driving, but judgment. Knowing when a surface is unstable and likely to give way is critical to avoiding a situation that requires a difficult and potentially dangerous recovery. In Canada, with its diverse and often water-logged terrain, reading the ground is a vital science. Nature provides numerous visual clues that signal high water content and poor soil stability, and learning to recognize them can be the difference between a pleasant drive and a long walk home.
One of the most treacherous terrains is muskeg, common in Northern Canada. It often looks like solid, grassy ground but is actually a bog that can swallow a vehicle. The key is to look for indicator vegetation. The presence of plants like cattails, willows, and vibrant green moss are clear signs of a high water table and marshy, unstable ground. In the spring, dark, saturated soil near melting snowbanks is another major red flag. In summer and fall, be wary of deep, water-filled ruts that are often hidden by tall grass along a trail.
Another common trap is a dried mud hole. The surface may appear crusted and solid, but it can be a thin layer over a deep pocket of viscous mud that will break under the vehicle’s weight. When faced with a questionable section, a simple rule is to follow the highest set of existing tire tracks, as water naturally gathers in the lower-lying ruts. However, the most foolproof method is also the most humble: when in doubt, get out and walk it. Use a sturdy stick to probe the depth and consistency of mud or water. Feeling the ground under your own two feet is the best way to assess its ability to support several thousand pounds of steel.
- Spring Warning: Dark, saturated soil near melting snowbanks indicates high water content.
- Vegetation Clues: Cattails, willows, and bright green moss signal a high water table and boggy ground.
- Summer/Fall Hazards: Look out for deep, water-filled ruts concealed by tall grass.
- Dried Mud Traps: Be suspicious of crusted, solid-looking mud holes; they can be a thin crust over deep mud.
- Track Analysis: Always follow the highest set of tire tracks, as water pools in lower ruts.
- The Golden Rule: If you have any doubt, stop, get out, and walk the route first to test ground stability.
How to Correct a Slide Without Using the Brake Pedal
When a vehicle begins to slide on a low-traction surface, the driver’s instinct is almost always to slam on the brakes. This is the single worst thing you can do. Braking abruptly consumes 100% of your already-limited traction budget, locking the wheels and turning your vehicle into an uncontrollable sled. Correcting a slide is a counter-intuitive dance of steering and throttle inputs, and it begins with your eyes. You must fight “target fixation”—the tendency to stare at the object you’re trying to avoid. Instead, force your eyes and head to look towards your escape route, the open part of the road where you want to go. Your hands will naturally follow your eyes.
The next step is to diagnose the slide. Is it understeer, where the front of the car is plowing wide and not turning? Or is it oversteer, where the rear is sliding out? The correction is different for each:
- For Understeer (Front slide): You have asked the front tires to do too much turning for the available grip. Gently ease off the throttle and, counter-intuitively, straighten the steering wheel slightly. This reduces the demand on the front tires, allowing them to regain traction. Once you feel the grip return, you can re-apply steering input.
- For Oversteer (Rear slide): The rear tires have lost grip. Your correction is to “steer into the skid.” If the rear is sliding to the right, steer to the right. The key is to be smooth and proportional, not to jerk the wheel. In many modern AWD vehicles, a light and steady application of the throttle can help stabilize the vehicle by sending power to the front wheels and pulling the car out of the slide.
Modern vehicles are equipped with Electronic Stability Control (ESC), a system that automatically brakes individual wheels to help correct a slide. It’s a powerful safety net, but it works best when you provide smooth, correct steering inputs. Don’t fight the system; work with it by looking where you want to go and steering smoothly in that direction.
Winter-Rated Tires or True Snow Tires: Which to Choose for Montreal vs. Vancouver
In a country with such extreme winter diversity as Canada, the term “winter tire” is not a one-size-fits-all solution. The choice between a dedicated winter tire and a less aggressive “all-weather” tire is a critical safety decision dictated by local climate. The importance of this choice is reflected in driver behaviour; a 2022 study from the Tire and Rubber Association of Canada (TRAC) showed that winter tire usage has grown significantly, with about 70 percent of Canadian drivers now using them. The core difference lies in rubber compounds and tread design, tailored for very different conditions.
The climates of Montreal and Vancouver provide a perfect case study. Montreal experiences consistently deep cold, heavy snowfall, and, most importantly, ice. Vancouver’s winters are milder, dominated by rain and occasional wet snow at sea level, but with mandatory winter tire rules on the mountain passes ringing the city. A true, dedicated winter tire (like a Michelin X-Ice or Nokian Hakkapeliitta) uses a very soft rubber compound that stays flexible well below freezing, and its tread is covered in thousands of tiny slits called “sipes” that provide biting edges on ice. In contrast, an “all-weather” tire (like a Michelin CrossClimate 2) is a hybrid designed to be used year-round. It carries the same Three-Peak Mountain Snowflake (3PMSF) symbol as a winter tire, certifying it for severe snow service, but its compound is harder to withstand summer heat, and its tread is optimized for evacuating water to prevent hydroplaning.
For a driver, the choice is clear and dictated by geography, as summarized in the table below.
| City | Recommended Type | Key Features | Legal Requirements | Example Models |
|---|---|---|---|---|
| Montreal | Dedicated Winter Tires | 3PMSF symbol, optimized for -20°C to +7°C, ice-specific siping | Mandatory Dec 1 – Mar 15 | Michelin X-Ice, Nokian Hakkapeliitta |
| Vancouver | All-Weather Tires | 3PMSF certified, year-round use, wet performance | Required on mountain passes Oct 1 – Mar 31 | Michelin CrossClimate 2, Toyo Celsius |
Ultimately, using the correct tire for your conditions is one of the most significant safety improvements you can make. As Transport Canada states after extensive testing, the data is unequivocal: using a proper winter tire in winter conditions greatly reduces the risk of an accident. It is a non-negotiable component of safe driving.
Key Takeaways
- The Traction Budget is Finite: Your tires can only provide a limited amount of grip, which must be shared between accelerating, braking, and steering. Exceeding the budget on any surface results in a loss of control.
- Momentum is a Double-Edged Sword: It is a crucial asset for powering through mud and sand, but it becomes a massive liability on downhills or in corners if not managed with engine braking and smooth inputs.
- Read the Terrain, Not the Map: The most advanced driving skill is judgment. Learning to recognize visual cues of unstable ground (vegetation, soil colour, ruts) is more important than any recovery technique.
Driving on Active Logging Roads: Rules of the Road and CB Radio Etiquette
Driving on active resource roads, particularly the vast network of logging roads in British Columbia, is the ultimate test of a driver’s awareness and humility. These are not public roads; they are active industrial worksites where the rules of the highway do not apply. Here, physics and protocol override all else. The central, unbreakable rule is that loaded industrial trucks have the absolute right-of-way over all other vehicles, at all times. This is not a matter of courtesy but of physics; a fully loaded logging truck weighing over 60,000 kg has immense momentum and a braking distance that can be hundreds of metres long. You are faster, lighter, and more maneuverable; the responsibility to get out of the way is entirely yours.
Communication is the cornerstone of safety. Most industrial traffic operates using CB radios tuned to specific frequencies for each road network. It is your job to announce your position. A standard call would be, “Up-bound light vehicle at KM 32 on the Harrison Main,” which tells truck drivers you are a non-industrial vehicle heading away from the highway (‘Up’) at a specific kilometre marker. Listening to the chatter will tell you where the ‘Loaded’ trucks are and when the road is ‘Clear’.
If you do not have a radio, your defensive driving must be elevated to the highest level. Drive with your headlights on at all times, travel at a significantly reduced speed, and approach every blind corner as if a loaded truck is just around it. Be prepared to pull over completely or even back up to the nearest pullout to let industrial traffic pass. These roads are often narrow, steep, and have limited visibility, making adherence to this strict etiquette a matter of life and death.
Your Action Plan: Safe Conduct on Canadian Logging Roads
- Right-of-Way: Understand that loaded industrial trucks have absolute right-of-way over all other vehicles, without exception. Uphill traffic generally has right-of-way over downhill traffic, unless a loaded truck is involved.
- CB Radio Protocol: Announce your position clearly, stating your direction (‘Up’ or ‘Down’), vehicle type, and kilometre marker (e.g., “Down-bound light vehicle at KM 15”). Listen constantly for calls from ‘Loaded’ trucks.
- Headlights and Speed: If you have no radio, drive with headlights on at all times. Maintain a slow speed and be prepared to stop instantly, especially on blind corners and crests.
- Yielding Procedure: Be prepared to pull over completely into a designated pullout for any oncoming industrial traffic. This may require you to back up a significant distance.
- Situational Awareness: Constantly scan ahead for dust clouds, listen for engine noise, and treat every part of the road as a potential hazard. Never assume you are alone.
The next time you leave the pavement, do not just drive. Pilot your vehicle with a deep understanding of the forces at play. Apply these principles of physics and situational awareness to transform your confidence and capability on any Canadian trail you choose to explore.