Driving a logging road isn’t a scenic detour; it’s entering a live industrial worksite where the laws of physics are the only laws that matter.
- A loaded truck is a 130,000-pound train on gravel; it cannot and will not stop for you.
- Your radio isn’t for chatting, it’s a survival tool to make you predictable in a world of blind corners and dust clouds.
Recommendation: Your most important piece of gear isn’t your 4×4; it’s the humility to understand you are the visitor.
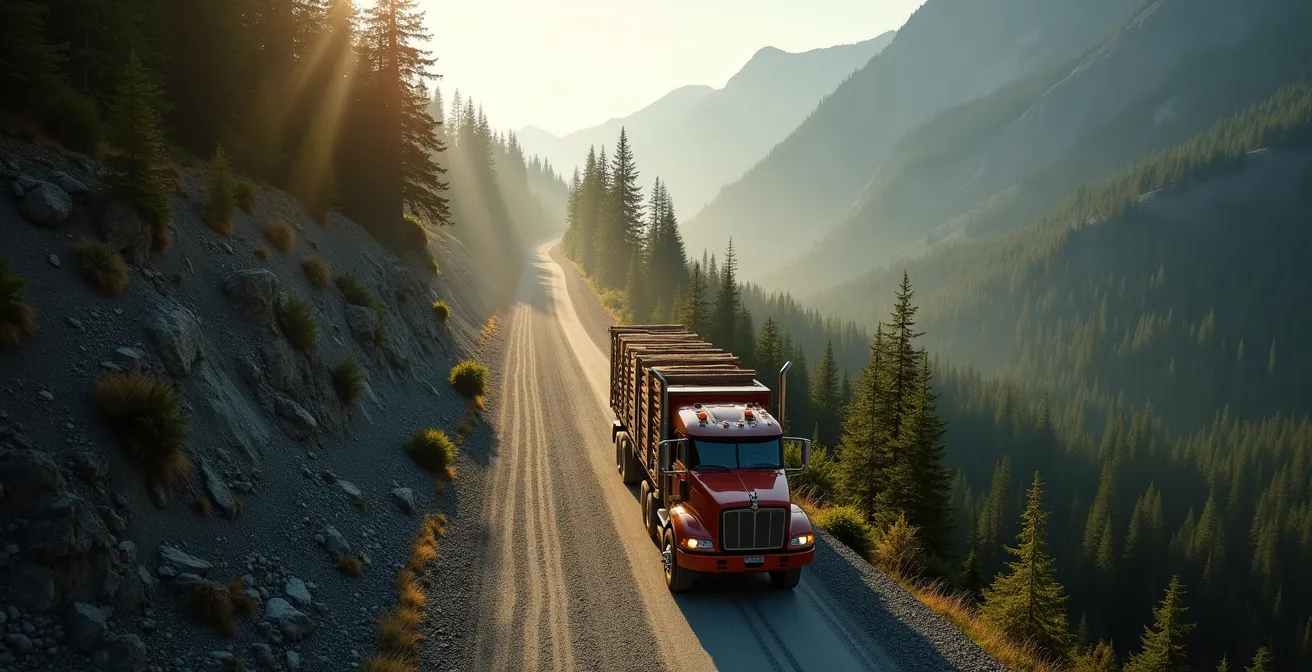
So, you’ve got your truck packed, the canoe is strapped down, and you’ve found a remote lake on the map that promises pristine fishing. The only thing between you and paradise is 50 kilometres of unpaved Canadian resource road. You’ve probably heard the basic advice: drive slow, keep your headlights on, and yield to logging trucks. That advice is fine, but it’s dangerously incomplete. It’s what you tell a child before they cross the street, not what you tell an adult entering a hazardous industrial zone.
What those guides don’t tell you is that the moment your tires hit the gravel, you’re not on a public road anymore. You’re a guest on a fast-paced, heavy-industrial worksite. My ‘office’ is a 130,000-pound rig moving on a narrow strip of dirt, and the only thing keeping us all safe is a shared understanding of unwritten rules and unforgiving physics. Your weekend adventure intersects with my livelihood, and there’s zero room for error.
This isn’t another gentle list of ‘dos and don’ts.’ This is the briefing you’d get from me, a trucker, before I’d even consider letting you follow my rig up the mountain. We’re going to cover the brutal physics of why I can’t stop for you, the radio language that makes you a predictable asset instead of a liability, how to handle the hazards you will face, and what gear actually matters when you’re alone and out of cell range. Pay attention, because out here, the difference between a great trip and a tragic headline is understanding your place.
This article breaks down the essential knowledge for safely navigating active logging roads. From the physics of heavy trucks to communication protocols and emergency preparedness, the following sections provide a comprehensive framework for survival.
Table of Contents : A Trucker’s Unwritten Guide to Canadian Logging Roads
- Why can’t a loaded logging truck stop for you?
- What channel to use and what to say to not be a danger on a logging road?
- How to drive when the truck ahead creates an opaque wall of dust?
- The vital mistake of blocking a pull-out or blind curve
- How to read distance markers to communicate your position in an emergency?
- Why do you lose 30 meters before even touching the brake pedal at 100 km/h?
- Flares or LED discs: what signaling is most visible in snow?
- Traction boards or winch: what gear to prioritize for solo exploration?
Why can’t a loaded logging truck stop for you?
Forget everything you know about braking on pavement. A loaded logging truck can weigh over 60,000 kg (130,000 lbs). It’s a freight train on rubber tires, governed by the brutal laws of momentum. When I’m coming down a 10% grade on loose gravel, I am not ‘driving’; I am managing a controlled fall. The idea that I can simply ‘hit the brakes’ for a deer, a pothole, or your suddenly stopped vehicle is a fantasy that will get you killed.
The physics are non-negotiable. Even on a flat, straight section of gravel, the BC Forest Safety Council confirms that loaded log trucks can take over 300 feet (90 metres) to come to a complete stop. That’s the length of a football field. On a grade or a curve, that distance increases exponentially. Your pickup truck can stop in a fraction of that, which creates a deadly mismatch in expectations. You see a clear road and stop; I see an immovable object inside my ‘zone of no return’.
When things go wrong, the consequences are catastrophic, and the physics are not in your favour. Every year in British Columbia, approximately 60 people are killed in crashes involving large commercial vehicles. In these collisions, the occupants of the passenger vehicle are at least four times more likely to die than the truck driver. Worse, official studies show that in fatal car-truck crashes, the passenger vehicle driver is found to be at fault in at least two-thirds of the incidents. The first rule of logging roads is this: the truck has the right of way because it has no other choice. Your job is to understand this and stay out of its path.
What channel to use and what to say to not be a danger on a logging road?
On a resource road, your radio isn’t for conversation; it’s a survival tool. It’s the only thing that makes you a predictable element in a high-stakes environment. Silence means you’re invisible, and invisibility is the most dangerous thing you can be. Most active regions in Canada rely on specific VHF radio frequencies, not CB radios. Showing up with the wrong equipment is like showing up to a gunfight with a knife.
The first thing you do when entering a resource road is look for a sign. It will post the radio channel, often as ‘RR-xx’ or a specific frequency. If there’s no sign, the road is likely not active, but you should still treat every blind corner as if a truck is coming. Your communication must be clear, concise, and follow a standard format. This isn’t the place for chatter or “good buddy” slang.
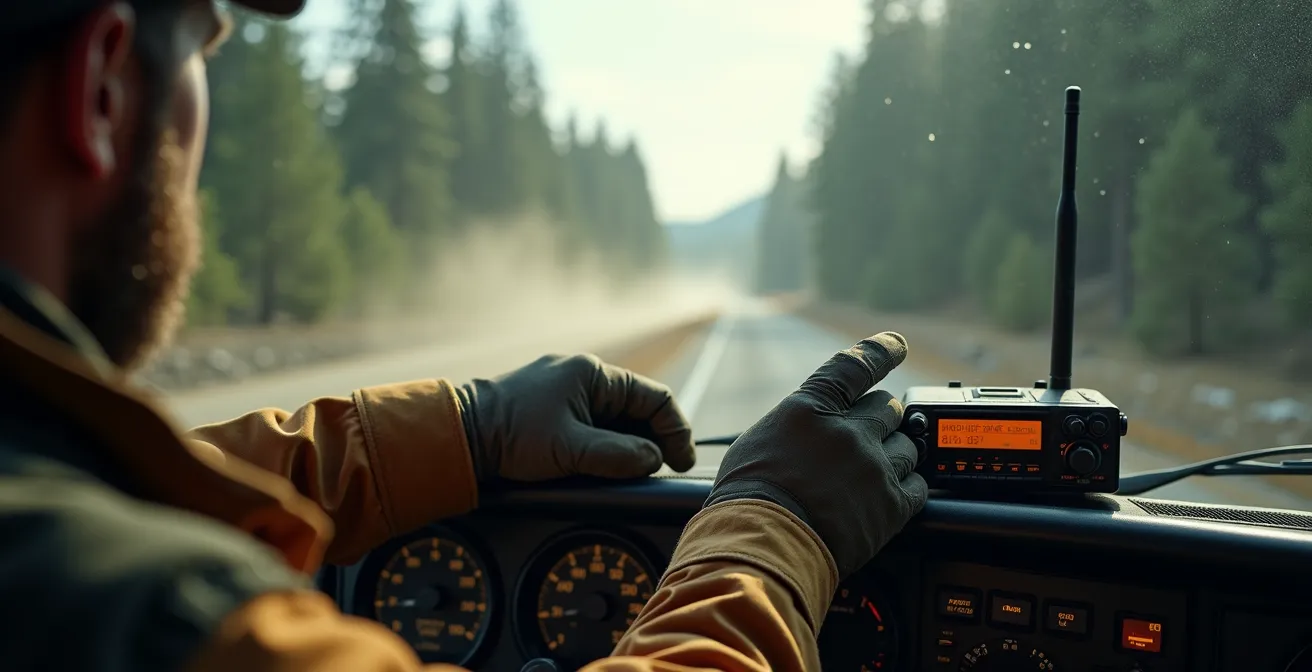
The goal is to broadcast your vehicle type, direction, and location. “Up” means you’re travelling away from the highway or town (generally increasing kilometre markers), and “down” means you’re heading towards it. Here is the standard, non-negotiable protocol:
- Look for signs posted at the start of resource roads with ‘RR-xx’ (Resource Road channel) or specific frequency information.
- Program your VHF radio. If you don’t have one, get one programmed with the standard 40 Resource Road channels at a local mobile radio shop before you leave town.
- Call your position using the standard format: “Vehicle type, direction (up/down) at kilometre marker.” For example: “Pickup truck, calling up at kilometre 42.5.”
- Listen for other traffic. A trucker might respond, “Loaded truck coming down at 45.” This tells you that you have a 2.5 km buffer to find a safe place to pull over.
- If the channel is silent, it doesn’t mean it’s empty. Stop at blind corners, listen, and give a quick honk on your horn before proceeding with extreme caution.
How to drive when the truck ahead creates an opaque wall of dust?
In the dry summer months, every vehicle on a gravel road generates a dust cloud. A pickup truck creates a haze; a loaded logging truck creates a moving, opaque wall. Following too closely behind a truck is one of the fastest ways to end up in a ditch or in my rearview mirror after I’ve run you over. You are effectively driving with a blindfold on, with zero information about the road surface, upcoming turns, or hazards hidden in the cloud.
The only solution is to create space. Back off until you have clear visibility of the road surface well ahead of you. This may feel slow and frustrating, but it’s the only sane way to operate. Your vacation schedule is not more important than your life. This visibility rule is also why the BC Forest Safety Council mandates that drivers must travel with their headlights on at all times, loaded or empty, day or night. Your headlights might be the only thing that gives a driver coming the other way a split-second warning of your presence inside a dust cloud.
Never, ever attempt to pass a truck through its dust cloud. You have no idea what’s on the other side. Is the road clear? Is another truck coming down? Is the road about to narrow on a bridge? It’s a gamble with the worst possible odds. As veteran drivers with decades of experience often stress, the hazards are numerous and often invisible.
You’re driving into a solid wall. You have no idea if there’s a stalled vehicle, a moose, or another truck coming the other way inside that cloud. Back off, give space, or stop. Your schedule is not worth my life or yours.
– Gord Judson, a 45-year veteran log truck driver, as featured in a Resource Road Safety video
The dust isn’t an inconvenience; it’s a clear signal from the road. It’s telling you to slow down, increase your following distance, and respect the fact that you are operating with incomplete information.
The vital mistake of blocking a pull-out or blind curve
Pull-outs on a logging road are not scenic viewpoints or convenient places to have lunch. They are an essential piece of industrial safety equipment. They are the only places on long, narrow stretches where a massive truck and a smaller vehicle can safely pass each other. Stopping in one for any reason other than actively yielding to oncoming industrial traffic is a critical, potentially fatal mistake.
When you hear me call on the radio that I’m “coming down” and you’re “going up,” your immediate job is to find the next available pull-out, get into it as far to the right as possible, and stop. Not slow down. Stop. Wait until my entire rig, trailer and all, has passed you. Only then is it safe to pull back onto the main road. Blocking that space because you’re taking a photo forces me to either stop a 130,000-pound vehicle on a grade (which can be impossible) or try to squeeze past you, risking a sideswipe or forcing one of us into the ditch.
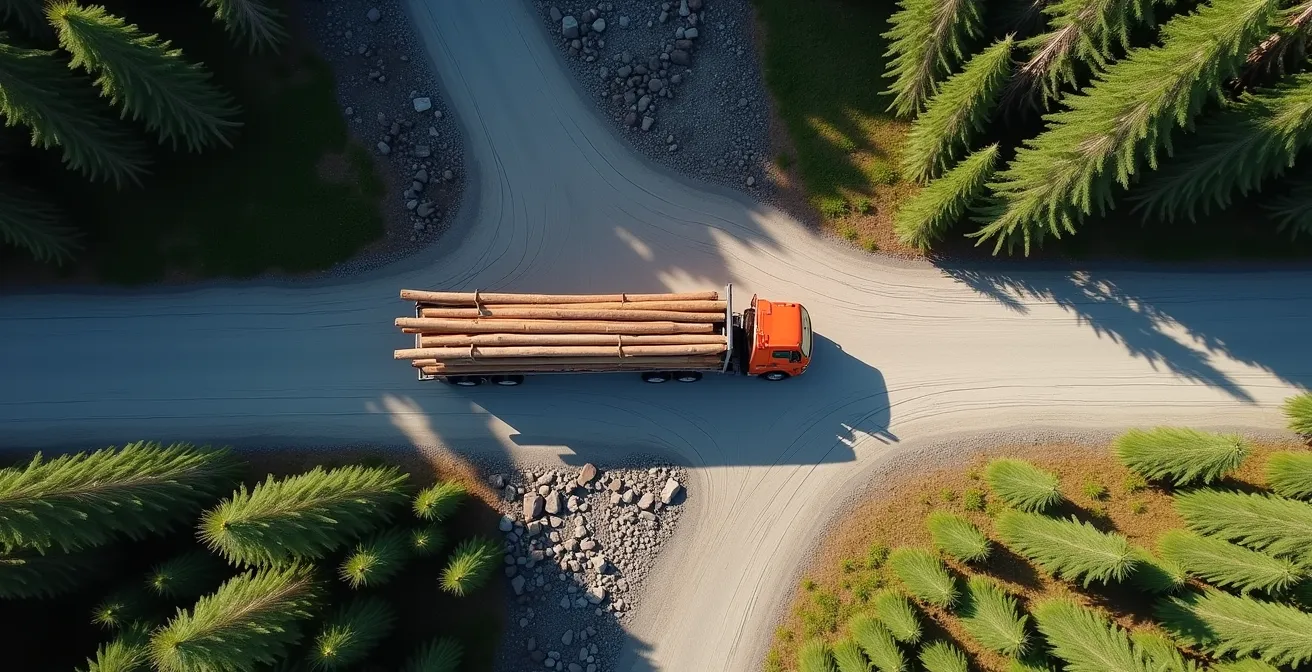
The same logic applies with even greater force to blind curves. The turning radius of a logging truck is enormous; the trailer often swings far wider than the cab. Parking on the outside of a curve means you are occupying the exact space my trailer needs to complete the turn. Here are the hard rules for stops:
- Never stop in a pull-out unless you are actively yielding to industrial traffic.
- When yielding, pull as far to the right as possible and come to a complete stop.
- Wait until the industrial vehicle has completely passed before re-entering the road.
- If no pull-out is available, find the widest, straightest spot possible and pull over completely off the travelled portion of the road.
- Never park on the outside of curves where visibility is limited for you and other drivers.
How to read distance markers to communicate your position in an emergency?
Out on a resource road, your cell phone is a brick. There are no bars, no GPS signal that can be easily transmitted. If you break down, have a medical emergency, or encounter a fire or washout, your only way to call for help and provide a location is your VHF radio and the kilometre markers. With over 620,000 kilometres of resource roads across BC alone, saying “I’m on the old logging road” is useless.
Kilometre markers are your lifeline. These small signs, posted every kilometre, are the universal addressing system for the backcountry. They generally start at ‘Km 0’ where the road leaves a main highway and increase as you travel further into the wilderness. Knowing how to read them and report your position is not just a good idea; it’s a critical safety skill that can mean the difference between a quick rescue and a multi-day survival ordeal.
Your responsibility is to be an active navigator. You need to know your location at all times. Calling “Mayday, mayday, I’m broken down somewhere past the big pine tree” will get you nowhere. A call of “Mayday, mayday, red pickup truck with a medical emergency at kilometre 33.5 on the Salmon River FSR” will get a response. You must be precise.
Action Plan: Reporting Your Position in an Emergency
- Note your starting point: At ‘Km 0’, note the official Forest Service Road (FSR) name.
- Actively track your progress: As you drive, call out and mentally note every kilometre marker you pass.
- Use your GPS as a log: Even without a cell signal, your phone’s GPS can get a location. Drop a pin every time you pass a marker as a backup log of your last known position.
- Communicate with precision: In an emergency, state the FSR name and your last confirmed marker. E.g., “Emergency, located at Km 27 on the Ashnola FSR.” If you are between markers, estimate: “approximately 500 metres past Km 27.”
- Identify road status: Fresh, well-maintained markers indicate an active road. Faded, damaged, or missing markers suggest a deactivated or unmaintained section, where help will take much longer to arrive.
Why do you lose 30 meters before even touching the brake pedal at 100 km/h?
Most drivers think of stopping distance as what happens after they hit the brakes. That’s a dangerous miscalculation. The total stopping distance is made up of two parts: reaction distance and braking distance. At 100 km/h, your vehicle travels nearly 28 metres every single second. The average driver’s reaction time—the time it takes for your brain to perceive a hazard and send a signal to your foot—is about 1.5 seconds. That means you’ve travelled over 40 metres before your brake pads even touch the rotors.
That’s the “lost” distance, and it happens on every surface, whether it’s dry pavement or slick mud. It’s a fixed law of biology and physics. But what happens next, the braking distance, is entirely dependent on the road surface. On a logging road, you are dealing with surfaces that offer drastically less friction than asphalt. Your tires have less grip, meaning your braking distance will be significantly longer.
This is where so many recreational drivers get into trouble. They are used to the predictable stopping power of pavement and fail to adjust for gravel, dirt, or mud. The following data from BC’s resource road safety guidelines, while calculated at a lower speed of 60 km/h, clearly shows how dramatically the surface impacts your ability to stop. Remember, this braking distance is *in addition* to the 17 metres of reaction distance already travelled.
| Surface Type | Speed | Reaction Distance | Braking Distance | Total Stopping Distance |
|---|---|---|---|---|
| Dry Pavement | 60 km/h | 17m | 20m | 37m |
| Wet Gravel | 60 km/h | 17m | 60m+ | 77m+ |
| Loose Gravel (Resource Road) | 60 km/h | 17m | 70m+ | 87m+ |
| Snow/Ice | 60 km/h | 17m | 100m+ | 117m+ |
As you can see, the total distance required to stop on loose gravel is more than double that on dry pavement. At higher speeds, this difference becomes even more extreme. This is the math that governs survival on these roads.
Flares or LED discs: what signaling is most visible in snow?
Breaking down on a narrow road is bad. Breaking down in a winter snowstorm, with visibility dropping to near zero, is a life-threatening situation. Your vehicle is now a stationary hazard, and your priority is to become as visible as possible to any other traffic, especially a logging truck that needs hundreds of feet to stop. Your choice of emergency signal can make a huge difference, particularly in blowing snow.
While reflective triangles are a legal requirement, their effectiveness depends on another vehicle’s headlights hitting them. In a whiteout, that might be too late. The real debate is between traditional chemical flares and modern LED discs. Each has distinct advantages and disadvantages depending on the conditions.
Flares burn incredibly brightly and, more importantly, produce heat. This thermal signature can sometimes be detected through fog or snow better than a simple light source. However, they have a short duration and pose a significant fire risk, making them completely unusable during summer fire bans. LEDs, on the other hand, have no fire risk and a much longer battery life, but their light can be absorbed or scattered by heavy snowfall.
The choice is not just about brightness, but about the *type* of visibility needed. Amber light, for instance, tends to cut through fog and dust better than red light. The following comparison breaks down the effectiveness for Canadian winter conditions:
| Signal Type | Visibility in Snow | Fire Risk | Duration | Best Conditions |
|---|---|---|---|---|
| Chemical Flares | High (heat signature visible) | High | 15-30 minutes | Winter/wet conditions only |
| Amber LED Discs | Moderate (cuts through fog) | None | 8-12 hours | All seasons, especially fire ban periods |
| Red LED Discs | Low (absorbed by snow) | None | 8-12 hours | Clear conditions |
| Reflective Triangles | Variable (depends on headlights) | None | Permanent | High traffic areas |
The professional’s choice is often to carry both. Use the long-lasting, safe LEDs as your primary, long-duration warning, but have chemical flares in reserve for the absolute worst-case blizzard scenario where their intense heat and light offer the best chance of being seen. Safe winter driving requires extra preparation, and having the right signaling tools is a critical part of that, as confirmed by numerous winter safety resources.
Key Takeaways
- Physics Over Confidence: A loaded truck’s momentum is absolute. Your agility is your only defense.
- Communicate or Disappear: Your radio broadcasts your existence. Silence means you’re invisible and a liability.
- Space is Survival: Whether it’s from dust clouds, truck bumpers, or pull-outs, giving industrial traffic ample room is non-negotiable.
Traction boards or winch: what gear to prioritize for solo exploration?
Eventually, you might push your luck too far and find yourself stuck—in mud, snow, or a ditch. How you prepared for this moment will determine whether it’s a minor inconvenience or a major emergency. While a winch looks impressive on the front of a truck, it’s often not the best first choice for a solo adventurer. Winching is a complex and potentially dangerous skill that requires solid anchor points, which aren’t always available. For a lone driver, a simpler, safer tool is often more effective.
The undisputed king of solo recovery is a good set of traction boards. They are relatively safe, intuitive to use, and incredibly effective in the most common “stuck” scenarios like mud, sand, and snow. They work by providing a firm, grippy surface under your tire, allowing you to use your vehicle’s own power to drive out of trouble. They require no external anchors and present a much lower risk of injury than a highly tensioned winch cable.
Your gear should be prioritized like a pyramid of needs. The foundation isn’t recovery at all; it’s communication. If you’re in a situation you can’t get out of, you absolutely must have a way to call for help. Only then should you think about self-recovery. According to guidance from agencies like the Government of British Columbia for resource road travel, the hierarchy of gear is clear:
- Priority 1: Satellite communication device (InReach, SPOT). This is non-negotiable for any travel outside of cell coverage. It’s your only true lifeline.
- Priority 2: Traction boards. The safest first-line recovery tool for solo drivers.
- Priority 3: A quality shovel. You often need to dig before you can use any other tool.
- Priority 4: Recovery straps and shackles. Useful if another vehicle comes along, but relies on help.
- Priority 5: Winch. A powerful tool for experienced users in heavily treed regions (like BC, Ontario, or Quebec), but requires training and carries significant risk.
Ultimately, your best recovery tool is judgment. Knowing when to turn back is a more valuable skill than knowing how to use a winch. Don’t let your ego write a cheque your equipment can’t cash.
To put these principles into action, the next logical step is to build and practice with your own vehicle recovery kit and VHF radio before you hit the gravel. Your safety, and mine, depends on it.